
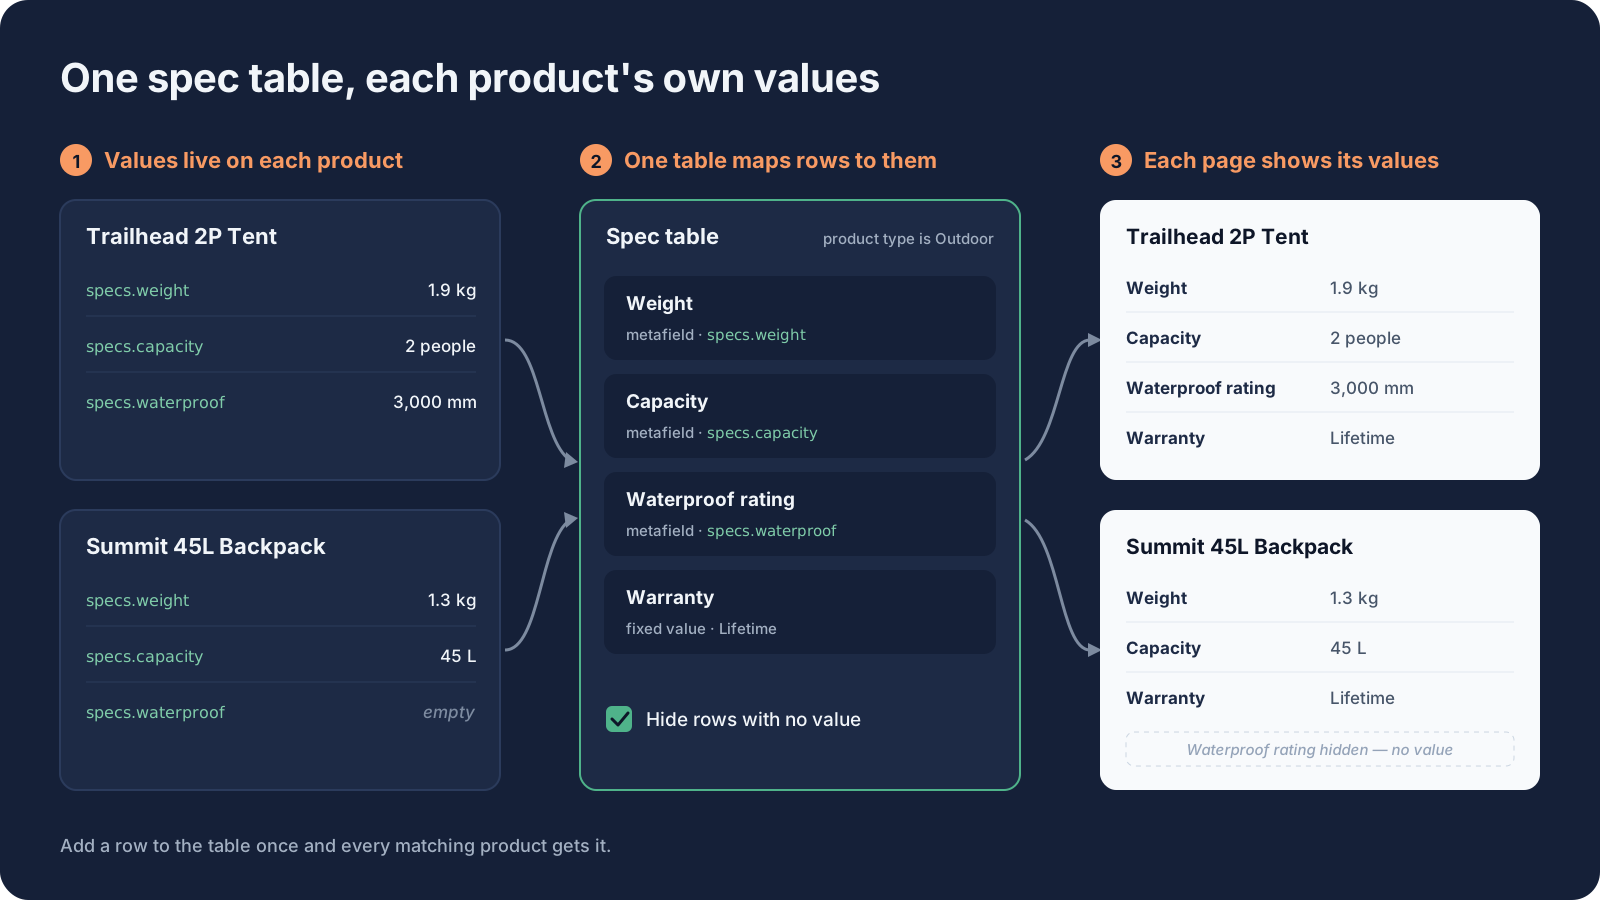
Short answer: store each spec (weight, dimensions, material) in a product metafield, then show those metafields in a table on the product page. Without an app, that means adding a block per spec in the theme editor or writing Liquid code. With Tabsly, you build one spec table, point each row at a metafield, and assign the table by collection, tag, vendor or product type. Every product shows its own values, and rows with no value are hidden.
Why a spec table beats specs in the description
Shoppers comparing technical products (outdoor gear, electronics, tools, furniture, bikes) scan for numbers: How heavy is it? Will it fit? What's it made of? A table with a label on the left and a value on the right answers that in seconds. A paragraph with the same facts makes them read.
The hard part isn't the table. It's keeping hundreds of tables right. The layout is the same for a whole product range, but the values differ on every product. That's why copying a table into each description breaks down.
Step 1: Decide your specs and create metafields
Pick the rows a product range needs, usually 5 to 12. For a tent, that might be weight, packed size, capacity, season rating, waterproof rating and material. Then create one product metafield per spec:
- Go to Settings → Custom data → Products and click Add definition.
- Name it (for example "Weight") and choose a type: single-line text, number, weight, dimension, volume and so on.
- Save, then fill in the value on each product's page in the admin, in the Metafields section.
Shopify can also suggest category metafields (such as color or material) once you set a product's category. Whichever you use, the values live on the product, which is exactly where per-product data belongs.
For large catalogs, filling metafields one product at a time is slow. Use Shopify's bulk editor, which can show metafield columns, or a CSV import tool.
Method 1: An HTML table in the description (no app)
The quickest start: in the product description editor, insert a table, or switch to HTML view and paste a <table>. It needs no setup, but every table is typed by hand, every product's copy is separate, and a new row ("Warranty") means editing every product. Fine for 10 products, painful for 500.
Method 2: Metafields with theme blocks or Liquid (no app)
Once the metafields exist, you can show them without copying:
- Theme editor, no code: in the product template, add a Text block per spec and use the dynamic source button to insert the metafield, with the label typed in front ("Weight: …"). You get a list rather than a real table, and an empty metafield leaves a dangling label on products that don't have it.
- Liquid code: add a Custom Liquid block, or edit the theme's product section, and write a table that prints
product.metafields.custom.weightand friends, wrapping each row in a check so empty rows don't show. This gives you a proper table, but you maintain code, and a theme update or switch can mean doing it again.
Both approaches show one table for every product on the template. If tents and backpacks need different rows, you need separate templates or more conditions in the code.
Method 3: One shared spec table with per-product values (Tabsly)
Tabsly has a dedicated spec table block. Each row has a label and either:
- a fixed value, the same on every product (for example "Warranty: 2 years"), or
- a product metafield, read on each product, so a row labelled "Weight" shows 1.2 kg on one tent and 2.4 kg on another.
Then:
- Assign the table by rules, such as "product type is Tent". The editor shows how many products match before you save.
- Make one table per range: a "Tent specs" table, a "Backpack specs" table, each with its own rows and rules.
- Add the Product content blocks app block to the product template once. The table shows as a tab, an accordion item or a stacked section, next to your other blocks.
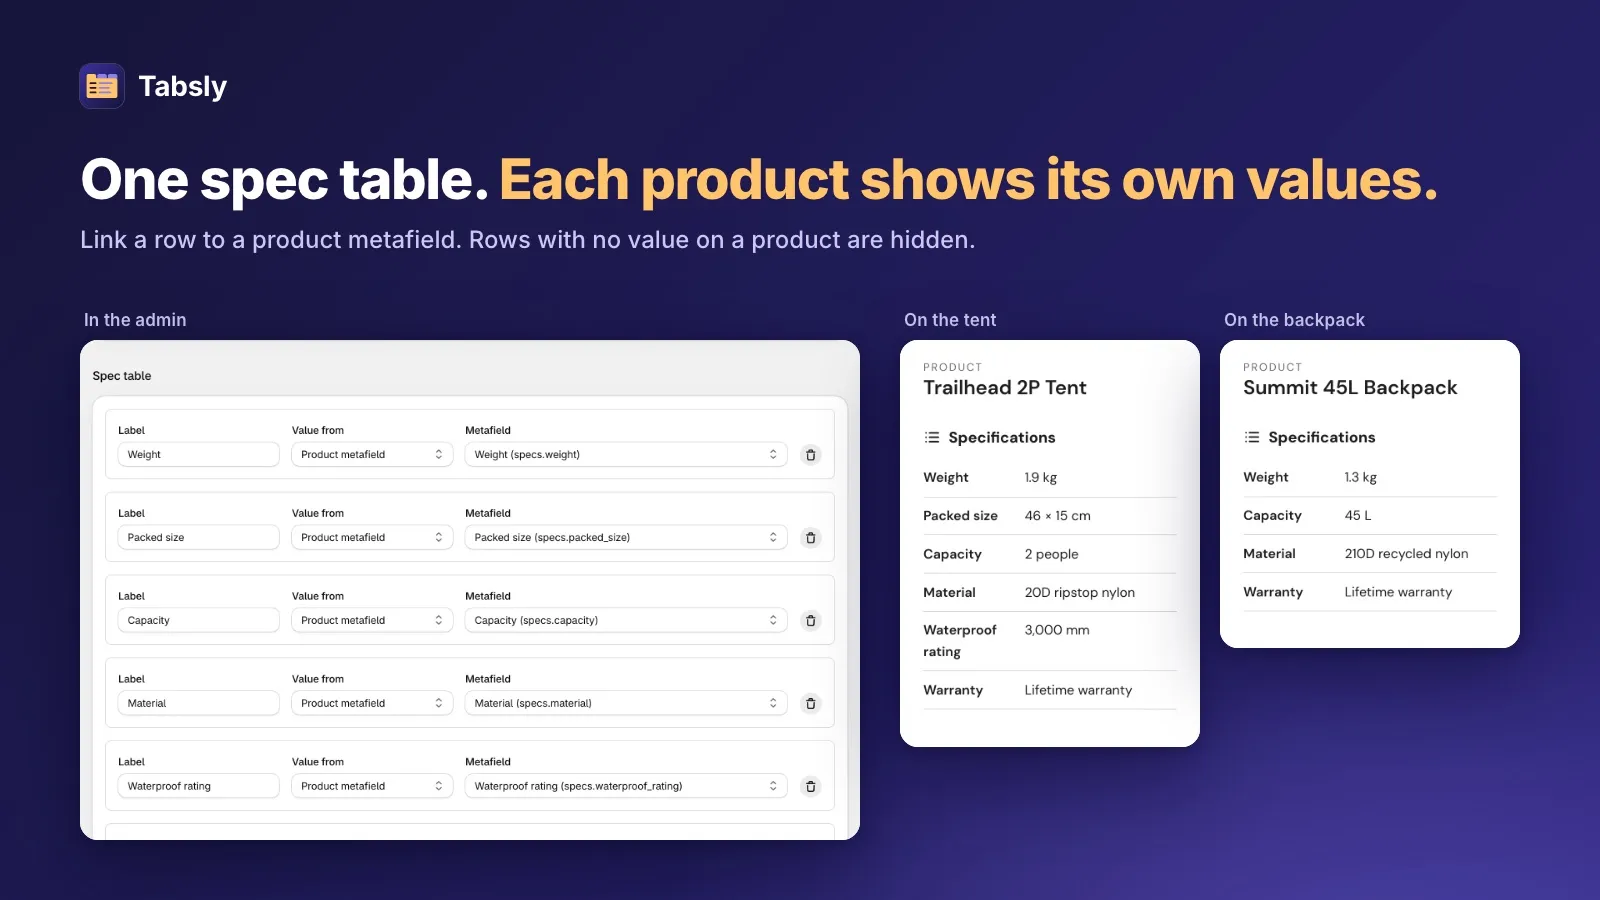
Rows with no value on a product are hidden, so a product missing one spec doesn't show an empty line. Add a new row to the table and every matching product gets it, with no description to edit. The table is rendered by your theme in the page's HTML, so search engines can read it.
Two things to know. Tabsly reads metafields; it doesn't create, fill or import them, so the values still come from Step 1. And content is per product, not per variant. Spec tables are on the Pro plan ($9.99/month), and the storefront table is in beta while it's checked on live stores.
Comparison
| HTML in description | Theme blocks + metafields | Custom Liquid | Tabsly spec table | |
|---|---|---|---|---|
| Real table layout | Yes | No, a list of text blocks | Yes | Yes |
| Per-product values without copying | No | Yes | Yes | Yes |
| Hides empty rows | Manual | No | If you code it | Yes |
| Different tables per product range | By hand | One template per range | In code | By rules |
| Add a row to every product | Edit every product | Edit each template | Edit code | Edit one table |
| Code to maintain | No | No | Yes | No |
| Cost | Free | Free | Free (your time) | Pro $9.99/month |
Tips for a good spec table
- Lead with what decides the purchase. Weight and size before country of origin.
- Use units every time. "1.2 kg", not "1.2". Shopify's weight and dimension metafield types keep units consistent.
- Use the same labels across a range. Consistent labels let shoppers compare two products quickly.
- Keep it scannable. Long explanations belong in the description or an FAQ. See how to add an FAQ section.
- Pair specs with documents. For technical or regulated products, a datasheet or manual next to the table helps. Tabsly's documents block lists files with their type and size, stored in Shopify Files.
A spec table usually sits in a tab next to the description and shipping info. For how to set those up, see how to add tabs to a Shopify product page.
Frequently asked questions
How do I add a specification table to a Shopify product without an app?
Either insert an HTML table into each product description, or store each spec in a product metafield and show it in the theme, with a Text block per spec using dynamic sources, or with a Custom Liquid block that prints the metafields as a table.
Where should I store product specifications in Shopify?
In product metafields, created under Settings, Custom data, Products, with one definition per spec such as Weight or Material. The values live on each product and can be shown in the theme or read by an app.
Can one spec table show different values on each product?
Yes, if its rows read product metafields. In Tabsly, each row of a spec table can read a metafield, so one table shared by a whole product range shows every product its own values, and rows with no value are hidden.
Does Tabsly fill in or import my product specs?
No. Tabsly reads product metafields you already have or create in Shopify. Fill them on the product page in the admin, with the bulk editor or with a CSV import tool.
Can I show different specs for each variant?
Not with Tabsly today. Its blocks are per product, not per variant. Variant-level specs need variant metafields and custom theme code.
Try Tabsly free on your Shopify store
Spec tables, documents, FAQs and rich text written once and shown on every matching product as tabs, an accordion or stacked sections.
Install free on ShopifyTabsly Team
Helping Shopify stores grow with smart automation.